|
Phantom Cine AMA for Avid (MacOSX and Windows)
and Demo Features
Version 1.0
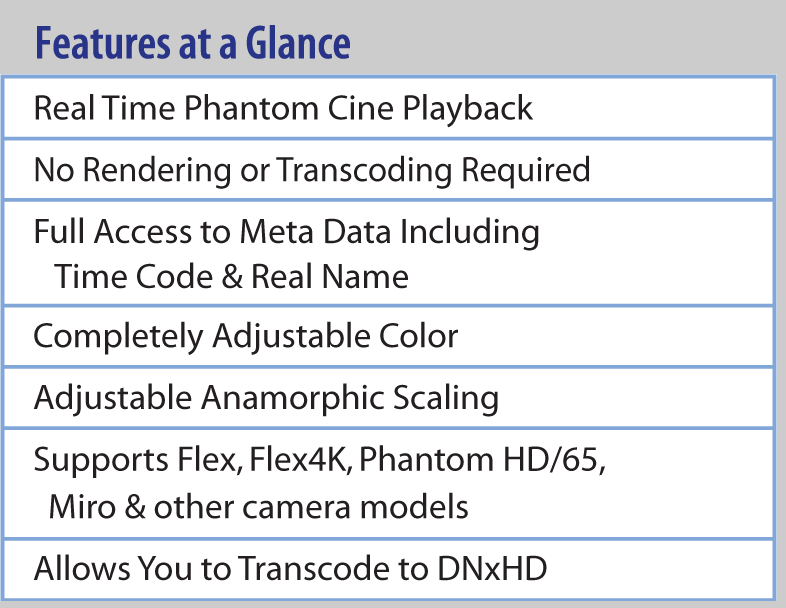
Phantom Cine AMA for Avid allows you to work with Phantom Cine ".cine" raw files natively in Avid Media Composer, without rendering or transcoding. On supported systems, you will be able to playback, edit or transcode the Raw files with ease. Adjust the color of the image, using the very same color controls that are used on the camera hardware. With the Phantom Cine AMA plugin, you will always have a perfect color match every time. You can modify the color of each individual shot non-destructively, leaving the original raw files unchanged.
Demo Features
Reads Phantom Cine files with a Water Mark (a Red Bar through the image),
Time Code is Fixed to 24 fps in the demo version,
Time Code time is Fixed to 09:09:09:00.
Phantom Cine AMA Reference
AMA Linking a Phantom Cine file
you can simply import Phantom
Cine files directly into the Media
Composer timeline, without any
transcoding or rendering.
To import Phantom Cine footage
using Media Composer 8.x, select
the "File...->Link to AMA
File(s)..." (or "File...->Link to AMA
Volume...") menu item. A panel
will open, allowing you to select
any Cine file that you have
available.
Once selected, your Phantom Cine
file will appear in your Bin. At this
point you can drag the clip onto
the timeline and start working
with it. No rendering required.
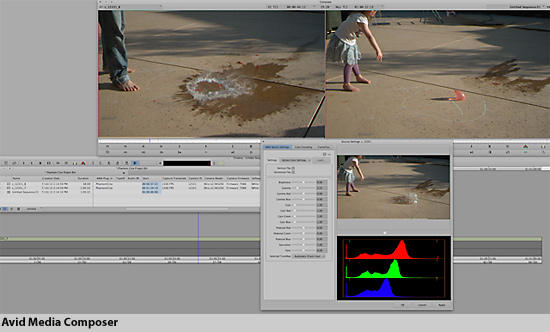
Changing the Phantom Cine Color Processing
Because the files are Raw files, you can non-destructively change the color settings to suit your
needs. Once you have a Cine imported into a Bin, you can right-click on it and select "Set
Source Settings..."
This opens a new "Source Settings" panel, in which you can adjust color of your Cine file. The
controls provided use the very same color science available in Glue Tool's Séance package or
Vision Research's PCC Camera package. When you adjust these settings, you are adjusting the
image the very same way that the camera hardware would.
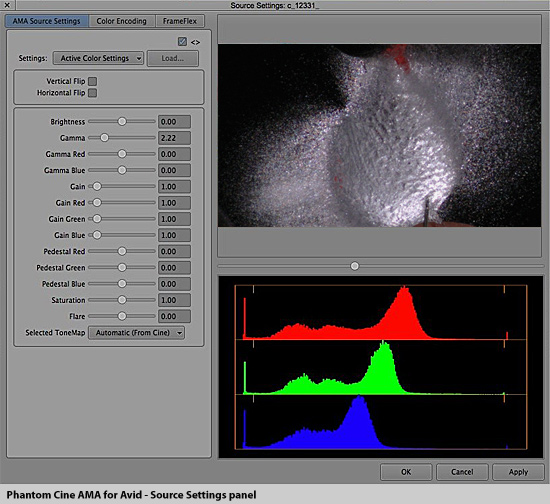
These sliders are populated by values that are stored in the Phantom Cine file's header. Any
changes that you make to these values will be saved inside the Avid MC project file. The original
Cine is never modified.
Resetting the values back to the Cine's original values is as simple as
selecting the "Settings" popup menu, and choosing "Default Settings."
This will restore your image back to the way it was originally saved.
The Color Controls, including --- Brightness, Gamma, Gamma Red, Gamma Blue, Gain, Gain
Red, Gain Green, Gain Blue, Pedestal Red, Green and Blue, Saturation, Flare and Tone Map ---
Each controls how the image is rendered on screen. As you adjust each of these values, you will
be able to see the preview image update. Once you have adjusted the imagery, you can select
"OK" or "Cancel" to exit the panel. The updated settings should now be applied to the Cine.
Changing the Image Aspect Ratio with FrameFlex
Anamorphic imagery is
loaded into Avid at full
resolution. This means
that the imagery will be
stretched when viewed. To
correct the imagery so that
it looks right, you can
open the Clip's Source
Settings menu. Once
opened, click on the
"FrameFlex" tab.
You will see an "Image
aspect ratio" popup menu.
This will likely be set to
the default aspect ratio for
the project. If you need to
change it, simply select
the ratio that you need,
here.
2.35:1 is used as an
example here.
Once you have selected
the desired aspect ratio,
click on Apply and "Ok" to
accept the changes.

 |
 |
This software has been created for
both MacOSX and Windows
|
Macintosh System Requirements:
- Avid Media Composer 8.0 or later,
- MacOSX 10.8.5 or later,
- A Mac system that meets Avid's minimum requirements,
- NVidia or AMD/ATI Graphics with OpenCL Support.
Windows System Requirements:
- Avid Media Composer 8.0 or later,
- Windows 7 (64-bit),
- A Windows 7 or 8 PC system that meets Avid's minimum requirements,
- NVidia or AMD/ATI Graphics with OpenCL Support.
How Licensing Works
All Glue Tools products are licensed on a "per machine" basis. This means that anyone can use the software on the machine that has the license.
If you need to move the license to a new system, you can. Simply use your license code to "Revoke" the license from your system. Once the machine has been revoked, you can go to your new machine and activate it. There are no restrictions or limitations on the number of times you can move your license.
How To Buy
All of our products are available from our web site. You can place an order for any combination of packages that you wish.
We accept most major Credit Cards, PayPal or Bill Me Later transactions. As we generate licenses manually, it may take a little bit of time. However, we are almost always able to get your licenses to you in a matter of minutes.
Feel free to contact us at sales@gluetools.com if you have any technical or sales questions about our products.
| |